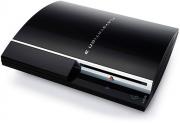
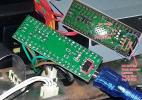
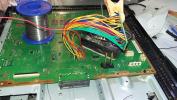
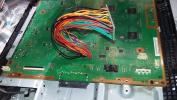
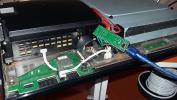
Got a PS3 console from my cousin. It’s PHAT version, yeah, the big-fat version, back in 2008 or something. The first thing I do with this console is tear it down LOL. I don’t have any PS3 game and I don’t play game on console, so maybe I’ll put Linux on this thing. Then I have to jail-brake this PS3 first. This entry is about hacking an old PS3 console.
I don’t play game on console because I find the thumbstick (analog stick) to control the camera or aim is just simply stupid. No offence, but how you gamers can play with that.
The sensitivity of that analog stick is not that good compare to the computer mouse. If you know how it works, it just simply like an volume pot, and you know how precise you can get with a simple volume pot like that? Yeah, that’s why, IMHO, FPS game (aka First Person Shooter) must be played on PC, period.
This one is just a fun project, so I don’t set high budget for it. Search around on ebay and google, I found some interesting info and videos about PS3 hack, like this Console Hacking 2010 - PS3 Epic Fail, and some how lead me to don’t steal hacker’s computer, quite entertainment LOL :D .
There is 3 major version of PS3: PHAT, SLIM and SUPERSLIM with a whole bunch of model codes. Go here Teensy++ 2.0 - PS3 dev wiki for full detail how to hack it. I just try to summary what I had to do with some side notes.
In order to hack PS3 for whatever reasons you might have, you need to Downgrade firmware to 3.55, because firmware 3.55 has a bug that allow you to update a CFW. That what i found on the internet. Another way is patch your current firmware so that it will allow CFW to be installed. Either of it requires dump the current firmware which stored on the onboard flash memory chip, NOR or NAND, and then use a software to modify the firmware parameters so that we can write back the patched firmware.
THERE IS NO OTHER OPTION!!.
All other methods, like usb stick thing that tricks the PS3 into running code in elevated memory area is not working anymore. I tell you, don’t trust youtube videos. Do you know why Sony released a sh~t load of firmwares for PS3 over time? To prevent people from hacking their PS3. So, pretty much, all the bugs, exploits are fixed. Not much you could do, only one choice: dump the firmware, patch it and write it back.
Here are the general steps:
- Preparing the Flasher.
- Dump the NOR File.
- Verify the NOR File
- Patch the NOR File
- Write the NOR File back.
- Finishing with installing CFW
My PS3 uses NOR chip and I use Teensy2.0++ for flasher which is cheapest solution. All the steps below are for a PHAT PS3.
STEP 1: prerequisite
- Download a hacked firmware (CFW) that higher or the same version of yours. (eg: your is 4.60, download CFW 4.60)
- Download an OFW same version as CFW you downloaded
- Install OFW so that your current FW is the same as CFW you downloaded
- Download NORway
- Download Way launchers
- Download BwE NOR Validator lasted version 1.31 can validate OFW up to 4.40
- Download PS3 Dump Checker validate upto OFW 4.89
- Download Teensy Loader
- Follow this wiki guide for the hardware part
- Order Teensy2.0++ or a counterfeit one with AT90USB1286
- Cut the 5v bridge on the regulator pad
- Do not join 3v3 bridge as it’s only for 3v3 USB systems, but PCs are 5v USB systems
- Solder 3v3 regulator MCP1825 on the back of teensy2.0++
- MCP1825 can be replaced with AMS1117 3v3 + little creative
- Solder all testpoints to Teensy2.0++
- Confirm all connections are good.
- Cut a big hole on the case for the wires so you can have some room for Teensy
The hard work is done, next steps are simple
STEP 2: Dump the NOR File
- Leave the plastic case open so you have access to Teensy.
- Connect teensy to PC via usb cable
- Install driver and stuff if need
- Power up PS3, to power up NOR chip because I don’t connect power from teensy to NOR chip
- Load teensy with NORway.hex, this will turn teensy to a NOR chip flasher, and stop PS3 from booting.
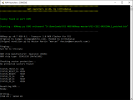
- Run NORway and dump data from NOR chip. It is quite slow to dump 16MB over serial connection (115200 bit/s I guess)
- Use NOR validator on the bin file you have downloaded. Check if most sections are OK, then all the soldering work are good. But if most sections are bad, you have to check the wiring from testpoints to teensy, maybe there are bad connection somewhere. Since you don’t have the original NOR dump of your PS3, and you write back a bad NOR dump, you risk bricking your PS3, unless you have a NOR dump from someone who has exactly PS3 model like yours.
- Save it some place safe, you might need it later in case some innocent guy accidentally upgrade your PS3 system.
STEP 3: Patch NOR file and write back
- Copy the dump to elsewhere and use “norpatcher.exe” to patch it so PS3 will allow to install CFW
- Check the dump and write back to the NOR chip use NORway or WAY-launchers
- Load teensy with “psgrade_at90usb1286_8Mhz_teensy++_2.0_noLED.hex” so it let PS3 boot again
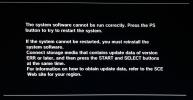
- PS3 will shoot out error
- Now, PS3 will allow you to install the CFW that has the same version as OFW on your PS3
STEP 4: Install CFW
- Plug in usb pen-drive contain CFW that you prepared
- Boot PS3 and follow instruction on the screen to install the system
